Custom Forms and Custom Columns |
FirstClass Designer is the tool you can use to create custom forms (Documents and Messages) that can be used on your FirstClass Server. If the document or message is designed to post specific information to a conference you can also use Custom Columns in the target conference so that field values on your custom form are displayed in the list view of your conference.
Custom Form |
Custom Conference |
|
|
This document is not meant to teach you how to use FirstClass Designer or to replace the FirstClass Designer course, but rather, will attempt to provide you with best practice ideas on how to create your custom forms in designer with the above example as a focus. In the process, I will attempt to answer the following questions.
1. What kind of form do I create in FirstClass Designer
Using FirstClass Designer, you can create forms of many kinds and each kind fits in a specific category. Here is an overview
Form Type |
Use |
Local Form |
Used for custom Messages. If the form is not created as a stationery, it will be displayed in the Message > New Message Special Menu |
Document Form |
Forms that can't be addressed. User Forms that are created in this category are displayed in the File > New Document > New Document Special menu. |
Registered Form |
Used for custom Messages. If the form is not created as a stationery, it will be displayed in the Message > New Message Special Menu |
Database Query |
Forms used when developing FirstClass RAD/FCAS applications. |
Database Hit List |
Forms used when developing FirstClass RAD/FCAS applications. |
Reserved |
Reserved for FirstClass. Do not create forms of this type. |
Toolbar |
Forms used to add categories to the Customize Toolbar form. |
For our purposes, we can choose Document if we want to have a non-addressable document or we can choose either Local form or Registered form if we want to create a message.
The choice of a document or a message is up to you and it depends on how you want to post information to your conference.
If you choose Document Form, then you can make a stationery of your document available in the conference (See step 3) so that those with  (Create Items and Edit Items) permission on the conference can create new versions of your custom document directly in
the conference.
If you choose Local Form, or Registered form, then you will be creating a message. Since this message is going to be designed specifically for a single purpose and not be used for any other purpose other than to post to your conference, the message should also be designated as a Stationery document
Note: Remember that every document or message on your system must have a unique form ID number so keep a record somewhere of all of the IDs that you use so that you do not duplicate them.
Messages |
Local Form |
Registered form |
Document |
Notes and Tips: |
|
- Do NOT set a document form as type Stationery. If you do, the document will get created in the user's mailbox and not in the target conference.
- Use the same text in both the Name and Title fields. The Name field is used in the list view within Designer and the Title field is used in FirstClass menus (either the Admin > New Stationery or New > New Document/Message Special Menus)
Avoid confusion and use the same name in both fields
- Choose an icon that will reflect the nature of the message/document. This is used as the default icon when the message/document is posted.
|
2. What are the required fields for a form or document?
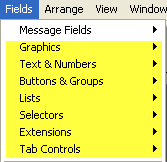 You can add as many custom fields or objects to your form as you like from the Graphics, Text and Numbers, Buttons and Groups, Lists, Selectors, Extensions and Tab Controls sections.
These are all custom fields or controls that will either enhance the look of your form or are created to accept input from your users.
There are a number of options available from the Message fields section however that can appear a bit daunting.
Which of the message fields are required for your custom messages or documents?
Messages
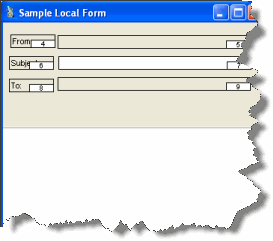 We will start with messages, because, believe it or not, they are easier.
All you really need on a message form is the 'From Name'*, 'Subject'* and 'To Names' fields.
The Guide fields can be added to provide information to your users so that they know what to enter into the fields.
All other fields, including the Message Date field are optional. Even though the date field is not displayed on your form, it is still there (invisible) and can show up in the conference list view.
*You don't even really need the From and Subject fields, but best practice would
recommend that you include it them.
You can organize the location of these fields anywhere you like on your form.
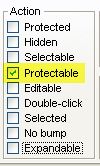 Tip: If you are creating a Stationery Message, set the attributes of the To: field to Protectable only.
With the field set this way, only the Admin/Sub Admin can address the message and has access to this field.
All other users will see it as protected. This way, the Admin/Sub Admin can install the stationery and address the message to the correct conference and know that the user cannot alter the address.
Documents
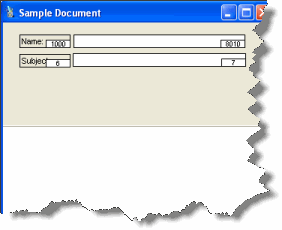 Like message forms, document forms can have as many custom fields and controls as you like. Document don't really have any required fields. You can create a custom document with only your custom fields but when you are asked to save your document, it will ask you for the document name, so best practice would recommend that you include a name field and a subject field on your custom document forms.
The Subject field is the same one that you use for messages, but there is no document Name field available from the selection list. So what do you do?
The Document 'Name' field is a special field numbered 8010. It is an editable text field so you can start by adding an editable text field to your document form and then renumber it 8010. When you try this, however, you get
The key is to enter the number and then hold the <Control> key down on your keyboard and press <ENTER> (On a Mac, hold the <OPTION> key down and press <ENTER>)
This will allow you to enter 8010 and it will stick.
Split view or Not
Whether or not you include the message portion or not in your custom form is up to you. If you want people to be able to enter a lot of text and be able to insert graphics and stylize the text, then you should show the message portion as well as the envelope portion (the portion where all the fields are placed)
To remove or reveal the message section, choose Form > Spit Bar
3. How do I install the form on my FirstClass system so that it can be used by my users?
Pushing out Custom Forms
Installing custom forms requires that you make the custom forms available to your users. You can have the FirstClass server 'push' the custom forms out to the client. There are a number of different ways to push out your custom resources.
The best way to do this is to put your custom settings file (.fc or .rez) that contains your custom forms in either the rules folder of the conference were the form or message is going to be initiated. That way, when the user opens the conference, the new form(s) will be pushed out and will merge with the settings file that the user is using when logged in to the server.
An alternate method would be to store the custom settings file in the Resources folder of a Group that a user belongs to. If you are going to store resources in a group's Resources folder, you must also ensure that the group's Desktop layout setting is set as  otherwise the resources will not get distributed when the user logs in.
Yet another method would be to store the custom settings file in the Resources folder of a Container Template that the conference belongs to. If that is the case, the Container Template group must also be set as
Finally, the last way to 'push' out resources would be to include the resources in the Resources folder of the All Desktops container template group.
The method you choose is up to you.
Installing Custom Forms
Now that you have pushed out your custom form, it can be installed so that your users can use it.
Installing a Stationery Document
If it is a Document form, it is now available under the File > New > New Document Special menu. If you created a Message form, it is available under the Message > New Message Special Menu. However, if you set the message form type to Type:Stationery as I have recommended, you will have to log in as an Admin or sub admin and you will find it under the Admin > New Stationery menu. Let's take a look at how I now install custom documents and stationery messages in a conference.
Custom Documents
Since I can't (shouldn't) create a document in designer and assign it as a Stationery type, I have to do this within the conference
1. Select your custom document File > New > New Document Special from within the conference where you want the document Stationery to be placed. This will immediately create a new document of this type in the conference itself.
2. Enter any data that you want in the document and close and save it.
3. Select the document and choose File > Properties (Get Info) and
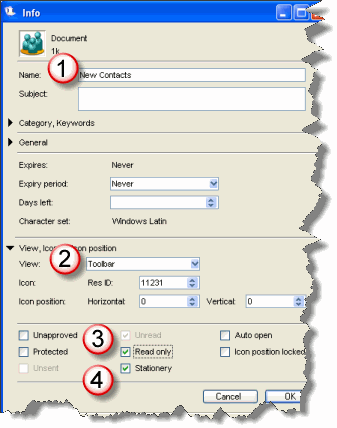 1. Give the document a name. This will be used as the name for the Stationery document
2. Set the View of the document to "Toolbar" and this will place the stationery document in the toolbar.
3. Check "Read Only" so that Admins and Sub Admins can use the form.
4. Check "Stationery" to turn the form into a 'tear off' stationery.
Close the properties window and save. This will place the stationery in the toolbar.
Tip: The stationery will be placed to the right of all other buttons. For the most part, most of the buttons are not applicable to a custom conference so you can remove those buttons from the toolbar so that all you are left with are the toolbar buttons that you want along with your stationery document.
Before
After
One final thing you MUST do is set the conference permissions to  so that all of your users will see this customized toolbar.
Extra Tip - Hiding the Toolbar Stationery.
If you only want certain people to be able to use the New Contacts stationery, you can HIDE it from others by Right-Clicking the toolbar stationery and choosing Properties to bring up the properties window again. Now, set it as unapproved 
Open the Conference Permissions one more time and set 
What this will do is Hide that toolbar stationery from everybody except those that have been assigned the  permission for that conference.
Installing a Stationery Message
If you created your custom form as a Stationery message, then you can install that stationery anywhere you like by choosing it from the Admin > New Stationery menu.
When you do this, the new stationery will be created in the location that you where in when you chose the menu item.
You can now enter your To: address in the To: field and populate any other fields that you like.
Once you have completed this, you can close the form and, as above, choose choose File > Properties (Get Info) and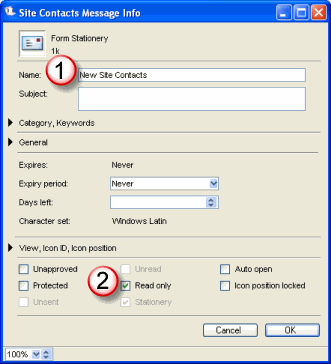 1. Give the message a name.
2.. Check "Read Only" so that Admins and Sub Admins can use the form.
There is no need to click on the Stationery checkbox as it is already checked.
Close the properties window and save.
If you are installing the stationery message in the same conference as your target conference, then you can use the same technique as described above to place it in the toolbar of the conference.
4. How can I create custom columns and what do the different column attributes mean?
Now that you have your form installed and you can successfully post documents or messages to the conference, you can set up custom columns on the conference so that values from fields on your custom forms will be shown in the list view of the conference.
This section will not go over all of the different features of the Custom Columns form, but rather focus on the information that you need to know to get your fields displayed in the column view.
To create a Custom Column view for a conference, first make sure that you have set the permission for the conference to  .
.
Open the RULES folder for the conference and click on  and this will create your Custom Columns setup form for your conference.
Since our conference is going to include a lot of custom columns, I suggest that you always choose  from the top of the form.
This means that you have to define every column that you want to have displayed in your list view.
|
Column Title I suggest you start by adding rows and entering the names of your columns first, in the order in which you want them to appear. Typically, the first three columns are the Icon, Flag and Attachments columns. These columns will have Icons instead of names as the column headers, but is it still useful to enter the names of these columns as a reference. A completed first column of the custom column setup might look like the one on the left.
In this example, those fields shown in yellow are fields that are known as System fields. Ones that you select from the pop-up list in the next column. |
|
Field For the Field column, you either choose from the selected list (if it is one of the field types that is generated by FirstClass) or you enter the Field ID number. What this means is that any item that is in the "Message Fields" category of the fields menu in FirstClass Designer, is a System field and has a corresponding item in the fields selection list. You can add fields to your custom column that are not even on your form and, because they are system fields, they will get added to your custom
columns. This includes such things as the Message (or document) Icon, the Last Modified Date, the flag, attachment icon etc. For the remaining fields, you enter the Field ID number of the corresponding custom field.
If you are using a Document and you have added the Name field (8010) then choose the Name field from the selection list. |
|
Type Here you select the Type of field that the field is. This means, what kind of item is displayed? Icon, text, number, date etc. For the most part, this should be self explanatory. What you should note
is that if the field is an "Editable Selection List" field, then you can just choose Text. The one to look out for is the field that is type "Static Selection List" in designer. In the custom columns Type Selection List, this is represented by "Enumerated List". |
|
Ref Form The only thing you have to worry about in this column, is if you chose Enumerated List in the Type column. If this is the case, you must enter the custom form's FormID in this column. |
|
Align/Sort and Propagation Choose Left or Right or Center for how you want your data to be displayed. The other options are beyond the scope of this document. For Propagation, the best rule of thumb is to choose System if you chose one of the default field types in column 2, and Up if you choose any other field value.
|
|
Icon If you want to replace the name that you entered in the first column with an Icon to represent the column name when displayed in the list view, select one here. To find small icons, hold the <Control> key down on your keyboard (<Option> key on a Mac) while clicking on the icon field and you will get the full range of icons, including the small ones. If
you accidentally choose an icon and you want to remove it, right click on the icon field and choose Delete. |
|
Max Str Size, Col Width and On Leave Max Str Size as Unlimited for all fields and set the Column Width to what you think is appropriate for the selected type of field. I find that for small icon fields, 20 is a good width. As for other fields, you will have to experiment. Finally, to have the custom column appear you must click on the On checkbox. |
Save and close the custom column form and open your conference and you should now see your custom view.
Existing forms will not display the custom columns. The custom columns will only get displayed for new entries or modified entries so it is best to create your custom columns before you make your conference available.
A final result might look something like this
The Message Body and the Preview Column
If you want to display the first 256 characters of your message or document body, you add the Preview type field
For this field, the propagation is 
In addition, you might also want to set the view properties for the list view of your conference to use Variable Height Rows. That way, the message text will wrap and show multiple lines.
 You can add as many custom fields or objects to your form as you like from the Graphics, Text and Numbers, Buttons and Groups, Lists, Selectors, Extensions and Tab Controls sections.
 Like message forms, document forms can have as many custom fields and controls as you like. Document don't really have any required fields. You can create a custom document with only your custom fields but when you are asked to save your document, it will ask you for the document name, so best practice would recommend that you include a name field and a subject field on your custom document forms.
 1. Give the message a name.
  and this will create your Custom Columns setup form for your conference.